Have you ever felt like your photos are too dark or too bright? Understanding the photography exposure triangle is the key to capturing perfectly balanced shots. This fundamental concept of photography combines aperture, shutter speed, and ISO to control the amount of light that reaches the camera sensor. But how do these elements work together to create well-exposed images?
Whether you’re a beginner looking to grasp the basics or an enthusiast aiming for mastery, unraveling this trio will elevate your photography game. Join us as we break down this essential principle and empower you with practical insights for honing your photographic skills.
Key Takeaways
- Understanding the exposure triangle is crucial for achieving well-exposed photographs.
- Adjust shutter speed, aperture, and ISO settings to control exposure and achieve desired creative effects.
- For beginners, practice using the exposure triangle in various lighting conditions to gain confidence and improve photography skills.
- Pay attention to composition and balance while utilizing the exposure triangle to capture visually compelling images.
- The role of light is pivotal in photography, and mastering the exposure triangle allows for better management of light in different scenarios.
- Adjust settings based on the exposure triangle to adapt to changing shooting conditions and achieve optimal results.
Defining the Exposure Triangle
Basics – The fundamental concept of the exposure triangle
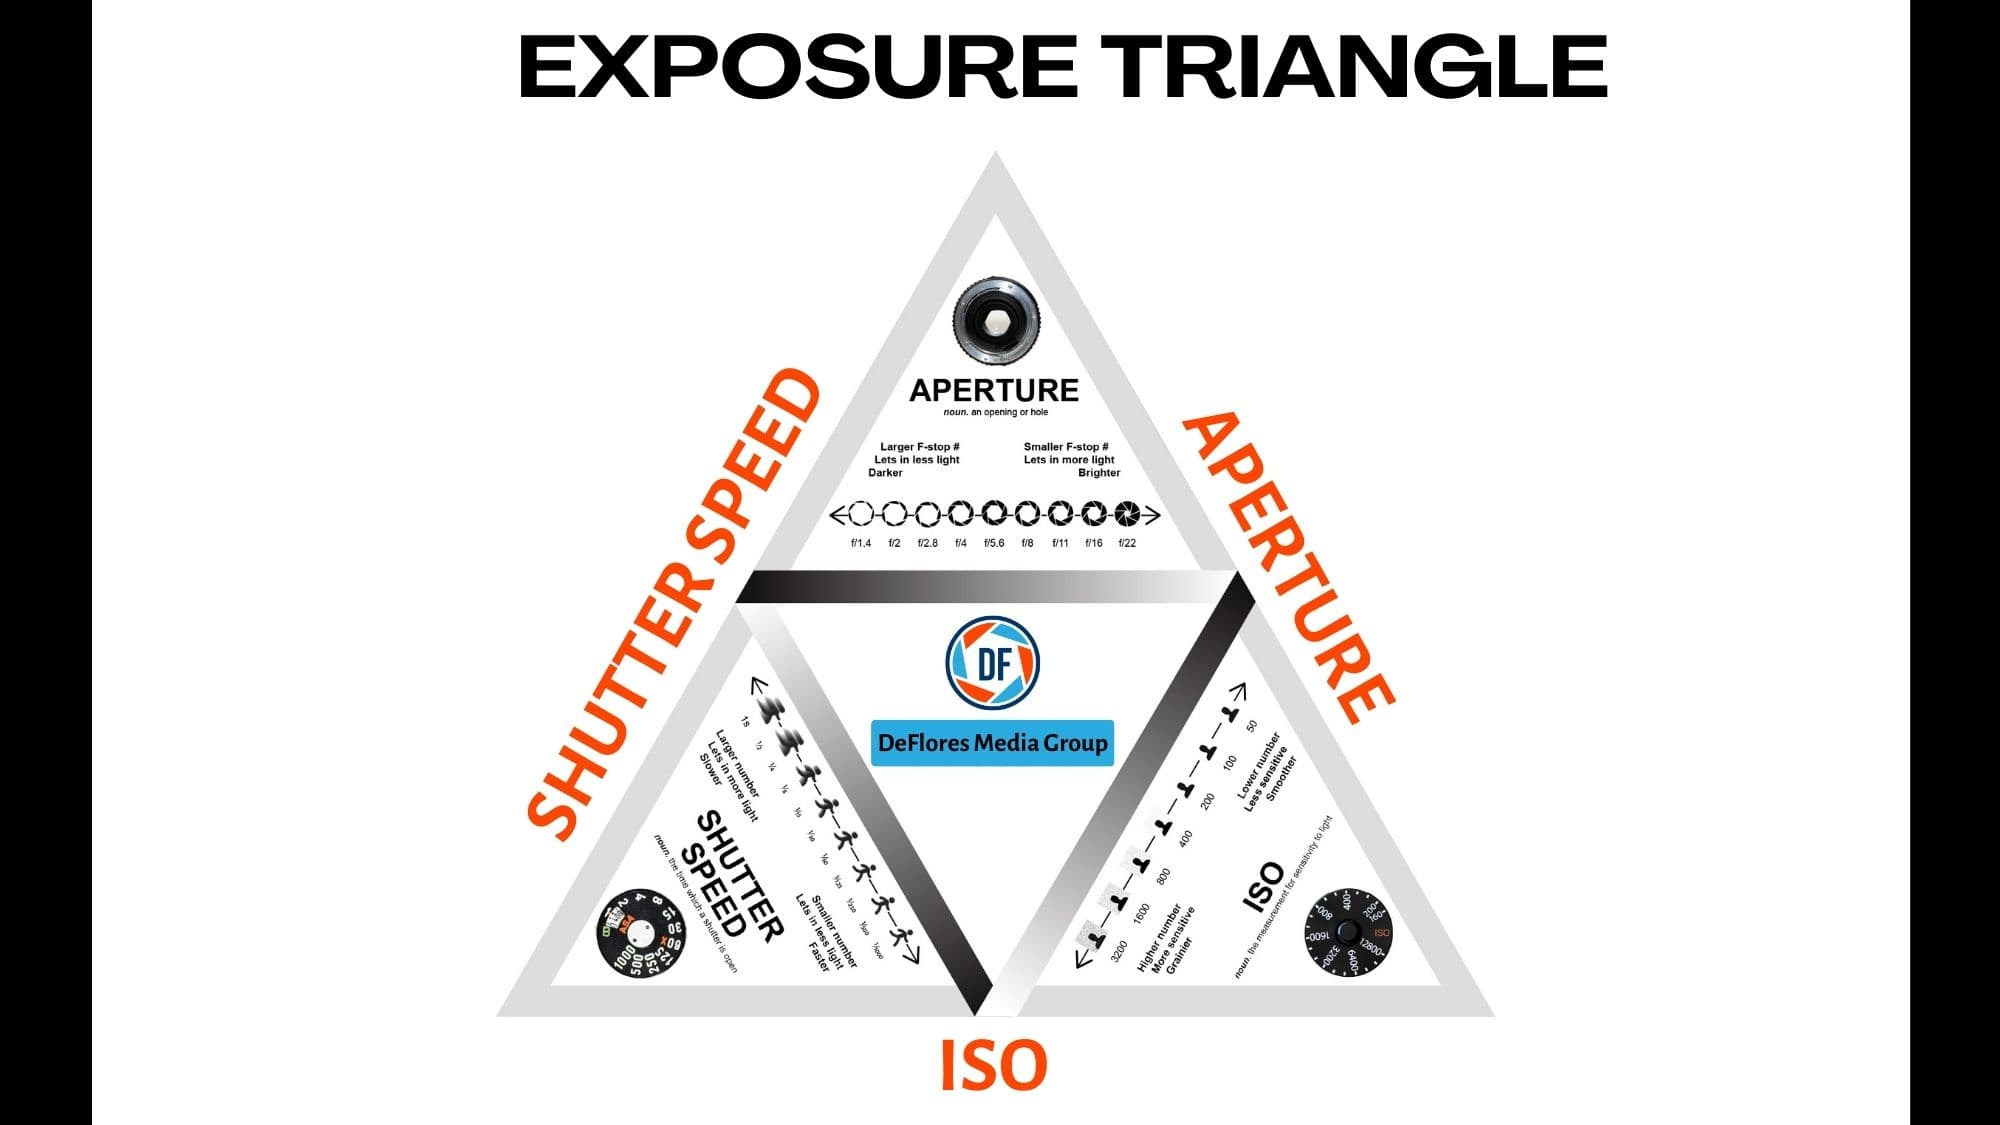
The photography exposure triangle is a crucial concept for photographers to grasp. It involves three key elements: aperture, ISO, and shutter speed. These three components work together to determine the correct exposure of an image. Understanding this foundational principle is essential for capturing well-exposed photographs.
Each element in the exposure triangle has a specific role in controlling how much light reaches the camera sensor. For example, the aperture regulates the size of the opening through which light enters the camera. Similarly, ISO determines the sensor’s sensitivity to light. At the same time, shutter speed dictates how long light is allowed to reach the sensor. By comprehending these principles, photographers can achieve proper image exposure values.
Importance – Why mastering the exposure triangle is crucial for photographers
Mastering the exposure triangle significantly impacts photographers’ ability to capture high-quality photographs. Balancing the aperture, ISO, and shutter speed ensures that shots are adequately exposed with optimal lighting and clarity. Without understanding this balance, photos may turn out too dark or bright due to incorrect exposure settings.
The significance of balancing these three elements lies in achieving equivalent exposures across different combinations of settings. This means that altering one element requires adjustments to one or both of the other two elements to maintain consistent exposure levels within a shot.
Components – Detailed breakdown of aperture, ISO, and shutter speed
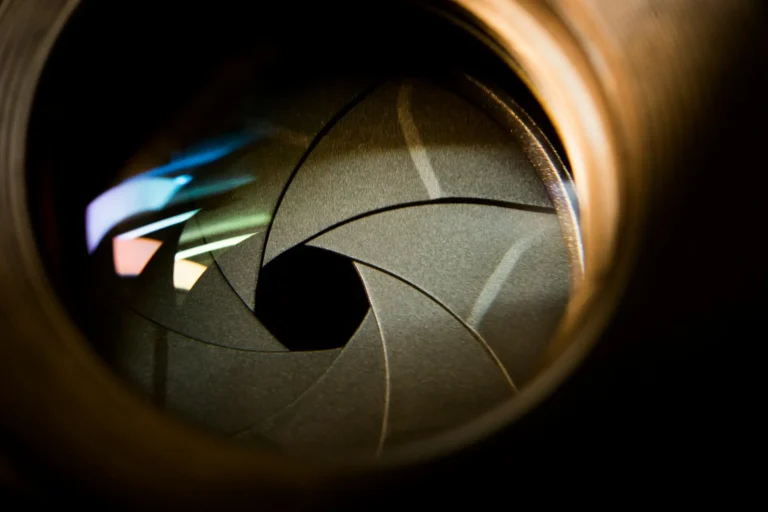
Aperture refers to the size of the opening in a lens through which light passes into the camera body. A wider aperture allows more light into the camera while creating a shallow depth of field; conversely, a smaller aperture permits less light but results in greater depth of field.
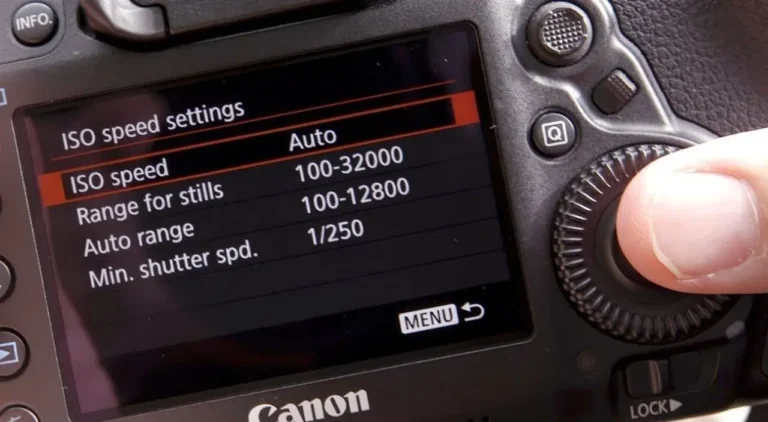
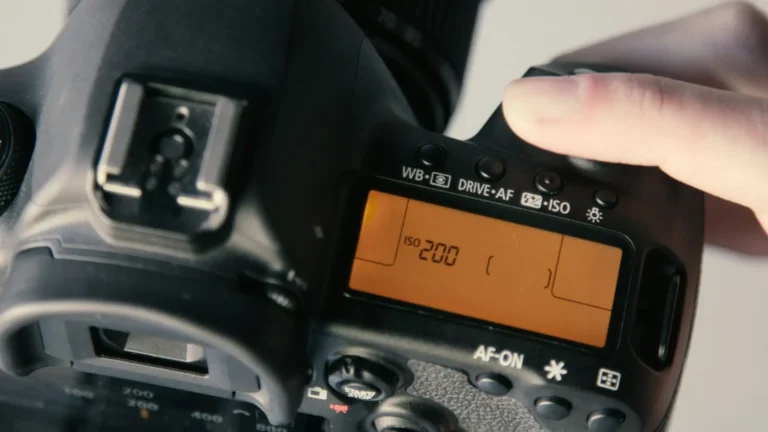
ISO measures your camera sensor’s sensitivity to light; lower numbers indicate less sensitivity (ideal for bright conditions), whereas higher numbers represent greater sensitivity (suitable for low-light situations).
Shutter speed determines how long your camera’s sensor is exposed to light; faster speeds freeze motion but allow less incoming light, while slower speeds create motion blur but enable more light to reach the sensor.
Exploring Shutter Speed
Definition
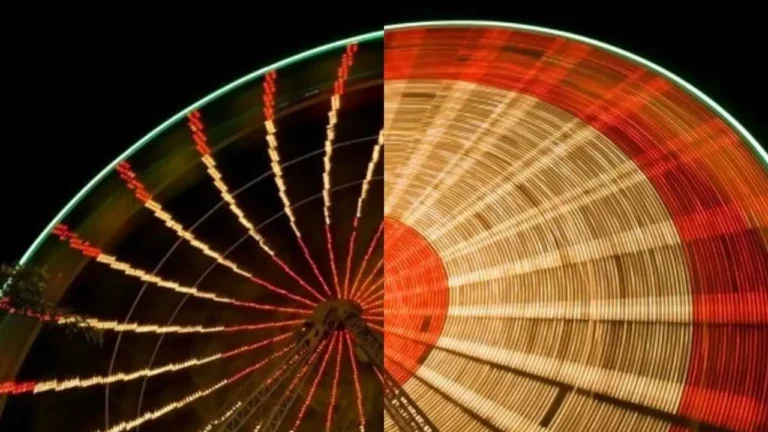
Shutter speed refers to the amount of time the camera’s shutter remains open to allow light onto the sensor. This setting dramatically influences how motion is captured in a photograph.
Understanding its significance in photography is essential as it directly impacts the outcome of an image. The proper shutter speeds can freeze action or create a sense of movement within a photo. For instance, fast shutter speeds can capture sharp images of moving subjects like athletes or wildlife. In contrast, slow shutter speeds can produce artistic effects such as smooth waterfalls or light trails from moving vehicles.
Effects
The choice of shutter speed has a significant impact on the final image. Different settings create varying effects contributing to a photograph’s overall quality and style. For example, when using fast shutter speeds (like 1/1000), moving subjects are frozen in action with minimal blur, making them appear crisp and clear. Conversely, slower shutter speeds (such as 1/30) introduce motion blur into photos by capturing movement over time.
Understanding underexposure and overexposure is also crucial when adjusting shutter speed settings. Underexposure occurs when there isn’t enough light reaching the camera sensor due to breakneck shutter speeds; this results in dark and poorly lit images lacking detail. On the other hand, overexposure happens with very slow shutter speeds that let too much light in, leading to excessively bright photos with washed-out details.
Tips
Mastering shutter speed within the exposure triangle requires practice and experimentation across different lighting conditions. Achieving optimal results involves understanding how various settings affect motion capture and exposure levels for specific scenes or subjects.
- In situations where you want to freeze fast-moving objects without sacrificing image clarity, consider using “shutter priority” mode on your camera.
- To avoid common mistakes related to adjusting exposure settings through shutter speed, continuously monitor your camera’s light meter readings while making adjustments.
Mastering Aperture

Understanding
Understanding the photography exposure triangle involves gaining a more profound knowledge of how light impacts exposure. Light is a crucial element in photography, directly affecting the exposure triangle. By recognizing this relationship, photographers can effectively control their camera settings to achieve the desired level of exposure. Correctly interpreting light is essential for better exposure control because it allows photographers to make informed decisions about aperture, shutter speed, and ISO settings.
Impact
The exposure triangle significantly influences image quality by pivotally capturing details and textures in photos. When properly managed, it can enhance the sharpness and clarity of an image while also affecting its overall visual appeal. For example, adjusting the aperture setting can impact depth of field, resulting in either a sharp focus on the subject with a blurred background (wide aperture) or having both foreground and background sharply focused (narrow aperture).
Advanced techniques for manipulating the exposure triangle offer creative opportunities for achieving artistic effects in photography. By mastering these techniques, photographers can use creative exposure adjustments to convey specific moods or emphasize some aspects within their compositions. Mastering exposure bracketing enables them to automatically capture multiple shots at different exposures—beneficial when dealing with challenging lighting conditions such as high-contrast scenes.
Demystifying ISO
Explanation
The photography exposure triangle comprises three key elements: aperture, shutter speed, and ISO. While often described as adjusting the camera sensor’s sensitivity to light, it’s more accurate to say that ISO controls the amplification of the light signal captured by the sensor. A higher ISO value amplifies this signal, allowing images to appear brighter in low-light conditions without a flash.
Understanding the interplay between these elements is crucial for producing well-exposed photographs. Adjusting the ISO value influences your use of shutter speeds and apertures in various lighting situations. By mastering how these settings interact, photographers can finely tune their images’ exposure and creative effects.
Role
The exposure triangle’s critical role is in shaping the look and feel of an image. Adjusting the ISO, along with the aperture and shutter speed, enables photographers to maintain balanced exposures across various lighting conditions. While a higher ISO can enhance image brightness in dim settings, it’s important to note that this amplification can also introduce digital noise, affecting image quality.
This nuanced understanding of ISO underscores its importance in creating visually compelling images, whether in bright daylight necessitating lower ISO values or poorly lit indoor scenes where higher settings are beneficial.

Adjustments
Precise adjustments within the exposure triangle are crucial to optimizing exposure for shooting scenarios. Knowing how to effectively tweak ISO values allows photographers to swiftly respond to the dynamics of their environment, ensuring proper exposure even when conditions change rapidly.
For example, increasing the ISO enables faster shutter speeds without compromising on exposure in situations with fast-moving subjects and insufficient natural light. This capacity for rapid adaptation within the exposure triangle is essential for consistently capturing high-quality images, regardless of external lighting conditions.
Practical Use for Beginners
Exploring optimal camera settings for controlling exposure
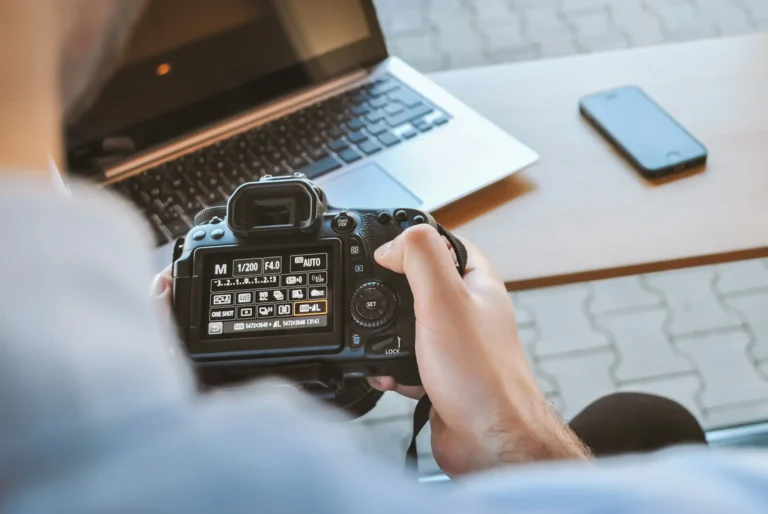
Mastering the manipulation of the photography exposure triangle involves understanding and exploring optimal camera settings. Photographers have maximum control over the aperture, shutter speed, and ISO in manual mode. By adjusting these settings, they can achieve ideal exposures in diverse environmental conditions.
For example, when shooting in bright daylight, a photographer may need to use a smaller aperture (higher f-stop number) to reduce the amount of light entering the camera. Conversely, in low-light situations or at night, a larger aperture (lower f-stop number) allows more light to reach the sensor. Similarly, adjusting the shutter speed helps capture motion or freeze action depending on the desired effect.
Adapting exposure settings to different shooting scenarios is crucial for overcoming challenges in various lighting situations. For instance, when photographing a subject against a bright background like snow or sand dunes, it’s essential to adjust exposure compensation to avoid underexposure caused by excessive brightness. On the other hand, capturing silhouettes against a sunset requires deliberate underexposure to emphasize shape and form.
Composition and Balance

Light and Content
Balancing the exposure triangle involves understanding how different types of light impact a photograph’s overall look. Natural light sources such as sunlight or moonlight affect the subject and exposure settings. Similarly, artificial lighting from lamps or flash units influences the scene differently. Recognizing these distinctions allows photographers to make informed decisions about exposure adjustments.
In practical terms, achieving harmony between light and content means comprehending how various lighting conditions interact with subjects in a photo. For instance, when capturing a landscape at sunset, understanding how natural light affects exposure helps adjust settings for optimal results. Likewise, when shooting portraits indoors using artificial lighting, knowledge of light sources aids in making appropriate exposure choices for balanced images.
Achieving Harmony
Deepening comprehension of natural and artificial light sources is essential for mastering the photography exposure triangle. It involves recognizing the characteristics of different types of light—whether soft or harsh—and their impact on exposures across diverse scenarios.
By acquiring an in-depth understanding of various lights’ properties—such as color temperature and intensity—photographers gain insights into how each type affects exposures uniquely. This knowledge empowers them to manipulate technical settings skillfully to achieve desired visual outcomes.
Utilizing this understanding enables photographers to make informed decisions regarding exposure adjustments based on specific lighting conditions during shoots. Whether adjusting the aperture for softer natural light outdoors or tweaking ISO sensitivity levels under low-light indoor environments, leveraging this awareness enhances one’s capacity to capture well-balanced photographs under diverse circumstances.
Role of Light
Understanding Light
The photography exposure triangle plays a crucial role in managing challenging lighting conditions. Understanding the exposure triangle allows photographers to make strategic adjustments to capture the perfect shot when faced with extreme or unpredictable lighting situations. For example, if a scene is too bright, they can adjust the aperture or decrease the ISO to reduce light sensitivity.
Photographers can adapt when environmental conditions change rapidly, such as sunset or sunrise, by manipulating the exposure triangle settings. This might involve adjusting the shutter speed to compensate for diminishing natural light and maintain proper exposure. By mastering these techniques within the exposure triangle, photographers gain greater control over their images regardless of lighting challenges.
Managing Conditions
The aperture regulates how much light enters through the lens and affects depth of field—how sharp or blurred elements appear in an image.
ISO determines the camera’s sensitivity to light; higher ISO values are suitable for low-light environments but may introduce graininess into photos. Shutter speed dictates how long light can reach the camera’s sensor; fast speeds freeze motion, while slow speeds create motion blur effects. By comprehensively exploring each component’s function within the exposure triangle, photographers understand how to manipulate them effectively.
Utilizing the Triangle
Aperture, ISO, Shutter Speed
Understanding the photography exposure triangle involves grasping how three crucial elements—aperture, ISO, and shutter speed—interact to determine the final image. For instance, when shooting in low light conditions, one can widen the aperture to allow more light into the camera. This action compensates for the limited available light by halving or doubling the light entering through the lens.
In contrast, when capturing fast-moving subjects such as athletes in a dimly lit indoor arena, increasing ISO sensitivity enhances image brightness without slowing down the shutter speed. By analyzing real-world examples showcasing the effective use of these exposure principles, photographers can learn from case studies that demonstrate the successful application of this fundamental concept in various scenarios.
By examining case studies demonstrating adaptation of exposure settings when transitioning between different lighting scenarios, photographers gain insights into adjusting techniques based on changes in ambient light conditions. For example, shooting a sunset landscape versus a brightly lit cityscape necessitates modifying exposure settings to accommodate differing levels of natural illumination.
Exploring exposure variations under diverse natural or artificial lighting further illustrates how manipulating each element impacts overall image quality and composition. Photographing moving waterfalls under bright sunlight versus soft moonlit scenes at nightfall with long exposures requires distinct adjustments to achieve optimal results.
Case studies provide invaluable lessons on adapting photography exposure triangle settings based on dynamic environmental factors such as shifting lighting conditions or subject movement. For instance, while capturing fast-paced wildlife activity during golden hour—shortly after sunrise or before sunset—adjusting shutter speed enables freezing motion without compromising proper exposure.
Similarly, exploring exposure variations when shooting under diverse natural or artificial lighting reveals how altering aperture size affects depth of field and overall sharpness within an image. Given specific lighting conditions, this knowledge empowers photographers to decide which aspect of their composition they prioritize.
Moreover, adjusting techniques based on changes in ambient light conditions is exemplified by seamlessly transitioning from outdoor daylight portraiture sessions to indoor studio setups where controlled artificial lighting demands recalibrating all three elements of the photography exposure triangle accordingly.
Adjusting Settings
In Different Light
When capturing images in different light conditions, it’s crucial to maintain a balance across all elements within the photography exposure triangle. This means achieving an optimal exposure equilibrium between aperture, ISO, and shutter speed. For example, when shooting in low light, you may need to widen the aperture (lower f-stop number), increase ISO sensitivity, and slow down the shutter speed to allow more light into the camera.
In contrast, shooting in bright sunlight requires adjusting settings to reduce the amount of light entering the camera. You should narrow the aperture (higher f-stop number), use a lower ISO setting for less sensitivity to light, and increase the shutter speed to prevent overexposure. By understanding how each element affects exposure and adjusting accordingly, photographers can capture well-exposed images in various lighting conditions.
Maintaining consistent balance when adjusting exposures across various shooting situations is essential for producing high-quality photographs. Whether photographing landscapes at sunset or capturing fast-moving subjects in action photography, mastering the exposure triangle enables photographers to adapt their settings quickly and effectively.
Final Remarks
You’ve now unlocked the secrets of the exposure triangle, understanding how shutter speed, aperture, and ISO work together to create stunning photographs. As you venture into photography, remember that mastering these elements is like conducting a symphony – each setting plays a crucial role in the final masterpiece. Don’t be afraid to experiment and push the boundaries of your creativity. Embrace challenges as opportunities to grow and refine your skills.
So, grab your camera and confidently capture the world through the lens. Practice makes perfect, so go out there and put your newfound knowledge into action. Keep exploring different scenarios and lighting conditions to truly grasp the power of the exposure triangle. Your journey to becoming a skilled photographer has just begun!
Frequently Asked Questions
What is the Exposure Triangle?
The exposure triangle refers to photography’s relationship between aperture, shutter speed, and ISO. It’s like a three-legged stool – each element supports the others to maintain balance and achieve proper exposure.
How does Shutter Speed affect an image?
Shutter speed determines how motion is captured in a photo. A fast shutter freezes action, while a slow one creates motion blur. Consider controlling how long a curtain stays open during a performance.
What does Mastering Aperture entail?
Mastering aperture involves understanding its impact on depth of field and light intake. It’s like adjusting the pupil of your eye – widening for more light or narrowing for sharper focus on specific objects.
Why is ISO important in photography?
ISO measures your camera sensor’s sensitivity to light. A lower ISO is ideal for bright conditions, while higher settings are used in low-light situations. It’s akin to adjusting your eyes’ sensitivity when moving from sunlight into dimly lit rooms.
How can beginners practically use the Exposure Triangle?
Beginners can experiment with different combinations of aperture, shutter speed, and ISO settings to understand their effects on photos. It’s like learning to juggle – practice helps you find the right balance for different scenarios.
Have you ever felt like your photos are too dark or too bright? Understanding the photography exposure triangle is the key to capturing perfectly balanced shots. This fundamental concept of photography combines aperture, shutter speed, and ISO to control the amount of light that reaches the camera sensor. But how do these elements work together to create well-exposed images?
Whether you’re a beginner looking to grasp the basics or an enthusiast aiming for mastery, unraveling this trio will elevate your photography game. Join us as we break down this essential principle and empower you with practical insights for honing your photographic skills.
Key Takeaways
- Understanding the exposure triangle is crucial for achieving well-exposed photographs.
- Adjust shutter speed, aperture, and ISO settings to control exposure and achieve desired creative effects.
- For beginners, practice using the exposure triangle in various lighting conditions to gain confidence and improve photography skills.
- Pay attention to composition and balance while utilizing the exposure triangle to capture visually compelling images.
- The role of light is pivotal in photography, and mastering the exposure triangle allows for better management of light in different scenarios.
- Adjust settings based on the exposure triangle to adapt to changing shooting conditions and achieve optimal results.
Defining the Exposure Triangle
Basics – The fundamental concept of the exposure triangle
The photography exposure triangle is a crucial concept for photographers to grasp. It involves three key elements: aperture, ISO, and shutter speed. These three components work together to determine the correct exposure of an image. Understanding this foundational principle is essential for capturing well-exposed photographs.
Each element in the exposure triangle has a specific role in controlling how much light reaches the camera sensor. For example, the aperture regulates the size of the opening through which light enters the camera. Similarly, ISO determines the sensor’s sensitivity to light. At the same time, shutter speed dictates how long light is allowed to reach the sensor. By comprehending these principles, photographers can achieve proper image exposure values.
Importance – Why mastering the exposure triangle is crucial for photographers
Mastering the exposure triangle significantly impacts photographers’ ability to capture high-quality photographs. Balancing the aperture, ISO, and shutter speed ensures that shots are adequately exposed with optimal lighting and clarity. Without understanding this balance, photos may turn out too dark or bright due to incorrect exposure settings.
The significance of balancing these three elements lies in achieving equivalent exposures across different combinations of settings. This means that altering one element requires adjustments to one or both of the other two elements to maintain consistent exposure levels within a shot.
Components – Detailed breakdown of aperture, ISO, and shutter speed
Aperture refers to the size of the opening in a lens through which light passes into the camera body. A wider aperture allows more light into the camera while creating a shallow depth of field; conversely, a smaller aperture permits less light but results in greater depth of field.
ISO measures your camera sensor’s sensitivity to light; lower numbers indicate less sensitivity (ideal for bright conditions), whereas higher numbers represent greater sensitivity (suitable for low-light situations).
Shutter speed determines how long your camera’s sensor is exposed to light; faster speeds freeze motion but allow less incoming light, while slower speeds create motion blur but enable more light to reach the sensor.
Exploring Shutter Speed
Definition
Shutter speed refers to the amount of time the camera’s shutter remains open to allow light onto the sensor. This setting dramatically influences how motion is captured in a photograph.
Understanding its significance in photography is essential as it directly impacts the outcome of an image. The proper shutter speeds can freeze action or create a sense of movement within a photo. For instance, fast shutter speeds can capture sharp images of moving subjects like athletes or wildlife. In contrast, slow shutter speeds can produce artistic effects such as smooth waterfalls or light trails from moving vehicles.
Effects
The choice of shutter speed has a significant impact on the final image. Different settings create varying effects contributing to a photograph’s overall quality and style. For example, when using fast shutter speeds (like 1/1000), moving subjects are frozen in action with minimal blur, making them appear crisp and clear. Conversely, slower shutter speeds (such as 1/30) introduce motion blur into photos by capturing movement over time.
Understanding underexposure and overexposure is also crucial when adjusting shutter speed settings. Underexposure occurs when there isn’t enough light reaching the camera sensor due to breakneck shutter speeds; this results in dark and poorly lit images lacking detail. On the other hand, overexposure happens with very slow shutter speeds that let too much light in, leading to excessively bright photos with washed-out details.
Tips
Mastering shutter speed within the exposure triangle requires practice and experimentation across different lighting conditions. Achieving optimal results involves understanding how various settings affect motion capture and exposure levels for specific scenes or subjects.
- In situations where you want to freeze fast-moving objects without sacrificing image clarity, consider using “shutter priority” mode on your camera.
- To avoid common mistakes related to adjusting exposure settings through shutter speed, continuously monitor your camera’s light meter readings while making adjustments.
Mastering Aperture
Understanding
Understanding the photography exposure triangle involves gaining a more profound knowledge of how light impacts exposure. Light is a crucial element in photography, directly affecting the exposure triangle. By recognizing this relationship, photographers can effectively control their camera settings to achieve the desired level of exposure. Correctly interpreting light is essential for better exposure control because it allows photographers to make informed decisions about aperture, shutter speed, and ISO settings.
Impact
The exposure triangle significantly influences image quality by pivotally capturing details and textures in photos. When properly managed, it can enhance the sharpness and clarity of an image while also affecting its overall visual appeal. For example, adjusting the aperture setting can impact depth of field, resulting in either a sharp focus on the subject with a blurred background (wide aperture) or having both foreground and background sharply focused (narrow aperture).
Advanced techniques for manipulating the exposure triangle offer creative opportunities for achieving artistic effects in photography. By mastering these techniques, photographers can use creative exposure adjustments to convey specific moods or emphasize some aspects within their compositions. Mastering exposure bracketing enables them to automatically capture multiple shots at different exposures—beneficial when dealing with challenging lighting conditions such as high-contrast scenes.
Demystifying ISO
Explanation
The photography exposure triangle comprises three key elements: aperture, shutter speed, and ISO. While often described as adjusting the camera sensor’s sensitivity to light, it’s more accurate to say that ISO controls the amplification of the light signal captured by the sensor. A higher ISO value amplifies this signal, allowing images to appear brighter in low-light conditions without a flash.
Understanding the interplay between these elements is crucial for producing well-exposed photographs. Adjusting the ISO value influences your use of shutter speeds and apertures in various lighting situations. By mastering how these settings interact, photographers can finely tune their images’ exposure and creative effects.
Role
The exposure triangle’s critical role is in shaping the look and feel of an image. Adjusting the ISO, along with the aperture and shutter speed, enables photographers to maintain balanced exposures across various lighting conditions. While a higher ISO can enhance image brightness in dim settings, it’s important to note that this amplification can also introduce digital noise, affecting image quality.
This nuanced understanding of ISO underscores its importance in creating visually compelling images, whether in bright daylight necessitating lower ISO values or poorly lit indoor scenes where higher settings are beneficial.
Adjustments
Precise adjustments within the exposure triangle are crucial to optimizing exposure for shooting scenarios. Knowing how to effectively tweak ISO values allows photographers to swiftly respond to the dynamics of their environment, ensuring proper exposure even when conditions change rapidly.
For example, increasing the ISO enables faster shutter speeds without compromising on exposure in situations with fast-moving subjects and insufficient natural light. This capacity for rapid adaptation within the exposure triangle is essential for consistently capturing high-quality images, regardless of external lighting conditions.
Practical Use for Beginners
Exploring optimal camera settings for controlling exposure
Mastering the manipulation of the photography exposure triangle involves understanding and exploring optimal camera settings. Photographers have maximum control over the aperture, shutter speed, and ISO in manual mode. By adjusting these settings, they can achieve ideal exposures in diverse environmental conditions.
For example, when shooting in bright daylight, a photographer may need to use a smaller aperture (higher f-stop number) to reduce the amount of light entering the camera. Conversely, in low-light situations or at night, a larger aperture (lower f-stop number) allows more light to reach the sensor. Similarly, adjusting the shutter speed helps capture motion or freeze action depending on the desired effect.
Adapting exposure settings to different shooting scenarios is crucial for overcoming challenges in various lighting situations. For instance, when photographing a subject against a bright background like snow or sand dunes, it’s essential to adjust exposure compensation to avoid underexposure caused by excessive brightness. On the other hand, capturing silhouettes against a sunset requires deliberate underexposure to emphasize shape and form.
Composition and Balance
Light and Content
Balancing the exposure triangle involves understanding how different types of light impact a photograph’s overall look. Natural light sources such as sunlight or moonlight affect the subject and exposure settings. Similarly, artificial lighting from lamps or flash units influences the scene differently. Recognizing these distinctions allows photographers to make informed decisions about exposure adjustments.
In practical terms, achieving harmony between light and content means comprehending how various lighting conditions interact with subjects in a photo. For instance, when capturing a landscape at sunset, understanding how natural light affects exposure helps adjust settings for optimal results. Likewise, when shooting portraits indoors using artificial lighting, knowledge of light sources aids in making appropriate exposure choices for balanced images.
Achieving Harmony
Deepening comprehension of natural and artificial light sources is essential for mastering the photography exposure triangle. It involves recognizing the characteristics of different types of light—whether soft or harsh—and their impact on exposures across diverse scenarios.
By acquiring an in-depth understanding of various lights’ properties—such as color temperature and intensity—photographers gain insights into how each type affects exposures uniquely. This knowledge empowers them to manipulate technical settings skillfully to achieve desired visual outcomes.
Utilizing this understanding enables photographers to make informed decisions regarding exposure adjustments based on specific lighting conditions during shoots. Whether adjusting the aperture for softer natural light outdoors or tweaking ISO sensitivity levels under low-light indoor environments, leveraging this awareness enhances one’s capacity to capture well-balanced photographs under diverse circumstances.
Role of Light
Understanding Light
The photography exposure triangle plays a crucial role in managing challenging lighting conditions. Understanding the exposure triangle allows photographers to make strategic adjustments to capture the perfect shot when faced with extreme or unpredictable lighting situations. For example, if a scene is too bright, they can adjust the aperture or decrease the ISO to reduce light sensitivity.
Photographers can adapt when environmental conditions change rapidly, such as sunset or sunrise, by manipulating the exposure triangle settings. This might involve adjusting the shutter speed to compensate for diminishing natural light and maintain proper exposure. By mastering these techniques within the exposure triangle, photographers gain greater control over their images regardless of lighting challenges.
Managing Conditions
The aperture regulates how much light enters through the lens and affects depth of field—how sharp or blurred elements appear in an image.
ISO determines the camera’s sensitivity to light; higher ISO values are suitable for low-light environments but may introduce graininess into photos. Shutter speed dictates how long light can reach the camera’s sensor; fast speeds freeze motion, while slow speeds create motion blur effects. By comprehensively exploring each component’s function within the exposure triangle, photographers understand how to manipulate them effectively.
Utilizing the Triangle
Aperture, ISO, Shutter Speed
Understanding the photography exposure triangle involves grasping how three crucial elements—aperture, ISO, and shutter speed—interact to determine the final image. For instance, when shooting in low light conditions, one can widen the aperture to allow more light into the camera. This action compensates for the limited available light by halving or doubling the light entering through the lens.
In contrast, when capturing fast-moving subjects such as athletes in a dimly lit indoor arena, increasing ISO sensitivity enhances image brightness without slowing down the shutter speed. By analyzing real-world examples showcasing the effective use of these exposure principles, photographers can learn from case studies that demonstrate the successful application of this fundamental concept in various scenarios.
By examining case studies demonstrating adaptation of exposure settings when transitioning between different lighting scenarios, photographers gain insights into adjusting techniques based on changes in ambient light conditions. For example, shooting a sunset landscape versus a brightly lit cityscape necessitates modifying exposure settings to accommodate differing levels of natural illumination.
Exploring exposure variations under diverse natural or artificial lighting further illustrates how manipulating each element impacts overall image quality and composition. Photographing moving waterfalls under bright sunlight versus soft moonlit scenes at nightfall with long exposures requires distinct adjustments to achieve optimal results.
Case studies provide invaluable lessons on adapting photography exposure triangle settings based on dynamic environmental factors such as shifting lighting conditions or subject movement. For instance, while capturing fast-paced wildlife activity during golden hour—shortly after sunrise or before sunset—adjusting shutter speed enables freezing motion without compromising proper exposure.
Similarly, exploring exposure variations when shooting under diverse natural or artificial lighting reveals how altering aperture size affects depth of field and overall sharpness within an image. Given specific lighting conditions, this knowledge empowers photographers to decide which aspect of their composition they prioritize.
Moreover, adjusting techniques based on changes in ambient light conditions is exemplified by seamlessly transitioning from outdoor daylight portraiture sessions to indoor studio setups where controlled artificial lighting demands recalibrating all three elements of the photography exposure triangle accordingly.
Adjusting Settings
In Different Light
When capturing images in different light conditions, it’s crucial to maintain a balance across all elements within the photography exposure triangle. This means achieving an optimal exposure equilibrium between aperture, ISO, and shutter speed. For example, when shooting in low light, you may need to widen the aperture (lower f-stop number), increase ISO sensitivity, and slow down the shutter speed to allow more light into the camera.
In contrast, shooting in bright sunlight requires adjusting settings to reduce the amount of light entering the camera. You should narrow the aperture (higher f-stop number), use a lower ISO setting for less sensitivity to light, and increase the shutter speed to prevent overexposure. By understanding how each element affects exposure and adjusting accordingly, photographers can capture well-exposed images in various lighting conditions.
Maintaining consistent balance when adjusting exposures across various shooting situations is essential for producing high-quality photographs. Whether photographing landscapes at sunset or capturing fast-moving subjects in action photography, mastering the exposure triangle enables photographers to adapt their settings quickly and effectively.
Final Remarks
You’ve now unlocked the secrets of the exposure triangle, understanding how shutter speed, aperture, and ISO work together to create stunning photographs. As you venture into photography, remember that mastering these elements is like conducting a symphony – each setting plays a crucial role in the final masterpiece. Don’t be afraid to experiment and push the boundaries of your creativity. Embrace challenges as opportunities to grow and refine your skills.
So, grab your camera and confidently capture the world through the lens. Practice makes perfect, so go out there and put your newfound knowledge into action. Keep exploring different scenarios and lighting conditions to truly grasp the power of the exposure triangle. Your journey to becoming a skilled photographer has just begun!
Frequently Asked Questions
What is the Exposure Triangle?
The exposure triangle refers to photography’s relationship between aperture, shutter speed, and ISO. It’s like a three-legged stool – each element supports the others to maintain balance and achieve proper exposure.
How does Shutter Speed affect an image?
Shutter speed determines how motion is captured in a photo. A fast shutter freezes action, while a slow one creates motion blur. Consider controlling how long a curtain stays open during a performance.
What does Mastering Aperture entail?
Mastering aperture involves understanding its impact on depth of field and light intake. It’s like adjusting the pupil of your eye – widening for more light or narrowing for sharper focus on specific objects.
Why is ISO important in photography?
ISO measures your camera sensor’s sensitivity to light. A lower ISO is ideal for bright conditions, while higher settings are used in low-light situations. It’s akin to adjusting your eyes’ sensitivity when moving from sunlight into dimly lit rooms.
How can beginners practically use the Exposure Triangle?
Beginners can experiment with different combinations of aperture, shutter speed, and ISO settings to understand their effects on photos. It’s like learning to juggle – practice helps you find the right balance for different scenarios.